Wednesday, July 25, 2012

Four Challenges!

Hello crafty friends!

Abby here, with another card for you.

This is my card for:

CMC- Anything goes with a girly twist
Crazy 4 Challenges- Stitches
Kraftin' Kimmie - Stitches
MarkerPop - color in black and white/sepia

Funny story, I had my focal image all colored up and was very pleased with it.  I was going to enter it in Kimmie's challenge from last weekend (polka dots), but wouldn't you know, we cleaned the craft room and now I can't find anything! Including my focal image! So, I colored another one.  oh well, she'll turn up eventually.

I have to say, this isn't my favorite card that I have ever made.  There's just too much going on.  But I felt like I had to keep adding some thing because it just wouldn't look right.  I think it really has to do with the direction the focal image girl is looking.  she leads your eyes right off the card, and there wasn't really anything I could do to bring it back. Oh well, live and learn.  I am satisfied with my copic coloring, however. I enjoyed trying a different technique.  I also stamped her in Memento London Fog to give the lines a softer look and she's stamped on xpress it blending card (by far my favorite copic paper). Her dress is paper pieced with authentique paper.


Well, I think thats all for tonight.

-Abby


Wednesday, July 18, 2012

Marker Pop Challenge #3/Kraftin Kimmie Challenge #137

The Marker Pop Challenge was to color an image in black and white or sepia tones.  I chose to color my focal image in black and white.  The Krafin' Kimmie element of the challenge was to use dots...dots on everything!

I used my Copic markers to color this image and I've got to say, this is one of the more challenging images I have ever colored and I really enjoyed it! I hope you do as well!


Sunday, July 8, 2012

MarkerPop/Kraftin Kimmie challenge!

Hello all,

I decided to make a card this weekend to enter into two different challenges, the MarkerPop color hair challenge and the Kraftin' Kimmie favorite stamp challenge!

Here is my card for the challenges:

I decided to use Alice, from the Alice in Wonderland KKS stamp set because she has all that LONG FLOWING hair and the Alice in Wonderland set is my ABSOLUTE favorite KKS set!  I had SO much fun coloring it!  I used my favorite copic artist's (Melanie Holtz) blog as inspiration for the colors to use for her hair.  I would have loved to experiment with the blues that Melanie used as well, but I didn't have them...:( time to make a new Copic order!

Alice was stamped on XPress It blending card with Memento Tuxedo black ink and the colors I used were as follows:

Hair: E50, Y21, Y23, E31, E33, E35, E59
Skin: E000, E11, E13
Dress: BG0000, BG05, BG02, BG07, BG09, E33, E35, C00, C3

The patterned paper is from Authentique and the brads are Spare Parts from Hobby Lobby.

Taking cues from Melanie, I made Alice's pupil a little bigger and gave her blue iris'. The reflection points in her eyes were made with a white Pentel RSVP pen, much easier I find, than the Copic opaque white.

Well, that's all I have for today!  Dad and I are training to run a 5K in February, and I suppose I have to get up now to go jog.  hmph.

-Abby

Kraftin' Kimmie Challenge

This week's challenge is to create a card from your favorite Kraftin' Kimmie stamp.  That one is really easy for me!  Drucilla was my first Kraftin' Kimmie stamp and she has remained my favorite for a few years!

I created this card using the Drucilla stamp and paper pieced her dress to match the background.  I colored her using my Copic markers and then cut the image and the sentiment using my Spellbinders dies and inked the edges before removing the die.  Ooooh, so many of my favorites in one card.  I hope you enjoy it!


Kim

Tuesday, July 3, 2012

Kraftin' Kimmie Challenge 135

I am finally back to participating in Kraftin' Kimmie's weekly challenges!  Lucy is one of my favorite Kimmie stamps so I chose her as the focal image.  This week's challenge was to create a white on white card.  This is quite a challenge for me since I love color.  I started by double embossing white cardstock creating an interesting background and leaving a smooth center for stamping Lucy.  I colored Lucy using my Copic markers and then mounted the focal image to a black layer and white card base.  Not bad for being away from coloring for a couple of months.  :)  I resisted adding any embellishments to the card so the focal image would not be overpowered.

Thanks for looking!

Kim


Wednesday, June 27, 2012

Challenge Sticks #2

Hello all,

I just finished publishing that last post, but wanted to enter this card in a challenge, so I find it's much easier to split the posts up.

I drew some challenge sticks out of the COI (Cup O' Inspiration).

Oh boy.  A St. Paddy's day card.  In June.  and hand stitching.  goodness. Anyone who knows any of the Davis women knows we don't hand stitch ANYTHING.  But! It was to be a challenge, and let me just say, I WON!

Anyways, I'm entering this card in the Unity Stamp Co. Kit of the Month challenge.  (It can be found HERE.) It's a sketch challenge and here's the sketch. 

It happens to be a very nice sketch. 

It occured to me that with the popsicle sticks and the sketch, my card is pretty much made, all I had to do was put it together.

Here's what I came up with...

I know, odd to see a St. Paddy's day card in June, but oh well.  Really the only thing I'm sure about on this card is that the stamps are from Unity and the flowers are from Spare Parts.  Solid color CS is from SU.

Hope you enjoyed!

Feel free to play along in the Stick Challenges!

-Abby

Challenge Sticks #1

Hello again crafty people.

Well, I said I would blog more, so here it is! And theres also one for after this!

Mom and I have been crafting tonight, so it's time to show and tell!

I had Justin draw a random set of popsicle sticks from the cup o' inspiration and here's what he drew:
I had to case ANOTHER card! Geez!

So here's my inspiration card:


It can be found HERE.

And....here's the card I made:

Ok so a cool thing that Mom and I found out a while back is that you can emboss metallic posterboard and it looks just like metal.  You can even use alcohol ink on it just like it was metal, and when it is on your project, it looks just like metal.  Well, apparently we used all of ours, because I couldn't find any. :-( So, seizing a moment of inspiration, and not wanting to cop out by using a metal brad...I went right on down to the kitchen and grabbed the good old reynold's wrap. Remembering that it looks really cool when embossed, I thought it would be perfect.

I got it all trimmed up and perfect (PS be very careful, what you may not know is aluminium foil can cut you as easily as a sharp knife, just be careful with the edges.)  I sent it through my cuttlebug, and was ecstatic with the results..COOL!  Then...I tried to glue it down.  yeah, not cool.  As you might can imagine, as I rolled my tape runner along the foil, it smashed my cool design right out.  Can you say UGLY?  Not to be deterred, I cut another piece of foil and stuck it immediately to a piece of white CS, THEN embossed.  That worked much better. Lesson learned. 

The rest of this card is pretty self explainatory.  If you have questions, feel free to comment below.

Thanks for checking out AbbysCrafty!

-Abby

It's been a while...

Hello crafty people!

Boy, do I have a LOOOOOONG post for you today. Mom and I have been hard at work at many different things.  The most pressing of which was moving me and Justin down here to Midlo with her and daddy. We can finally declare that one done, though.

I, of course, brought many craft items with me.  (A VERY small amount compared to everything I packed up, but still, we had to find somewhere to put it all.) So that's was project #2, organization!!!  Sometimes, I think Mom and I enjoy organizing our craft supplies better than we like actually USING them.  Anyone else feel that way?  So after finding a place for everything...I sat down this week to actually do some crafting.  I looked around the room.  I started to pick up some cardstock.  Then some ribbon.  Then some pins.  Then switched gears and decided to color, so I started looking at my stamps...then realized...I'm COMPLETELY overwhelmed in our craft room.  Which is nice, it's like having our very own Michael's/Hobby Lobby in our house.  But it really wreaks havoc on a crafter when you can't nail down what you really want to do. 

Enter: the cup o' inspiration.

What is this, you might ask? Well, every time I come into our craft room, I am finding that I get so utterly overwhelmed by all the different embellishments, stamps, cardstock, ink, techniques, etc, that I resort to just cleaning instead.  So, I created a solution to my creation problem. These are colored popsicle sticks that you can buy at any craft store, probably walmart as well.  On each stick I wrote something.  Each of the colors is a different category.  My scheme was that I would chose one of each color, then make a card that must utilize those four things.  On the yellow sticks are basic colors that must be used, on the blue ones: supplies/embellishment, on the red ones: an occasion, and the green ones: a technique that must be used. I figured that would narrow my focus and challenge my creativity, and boy, was I right!  Here is my first challenge:

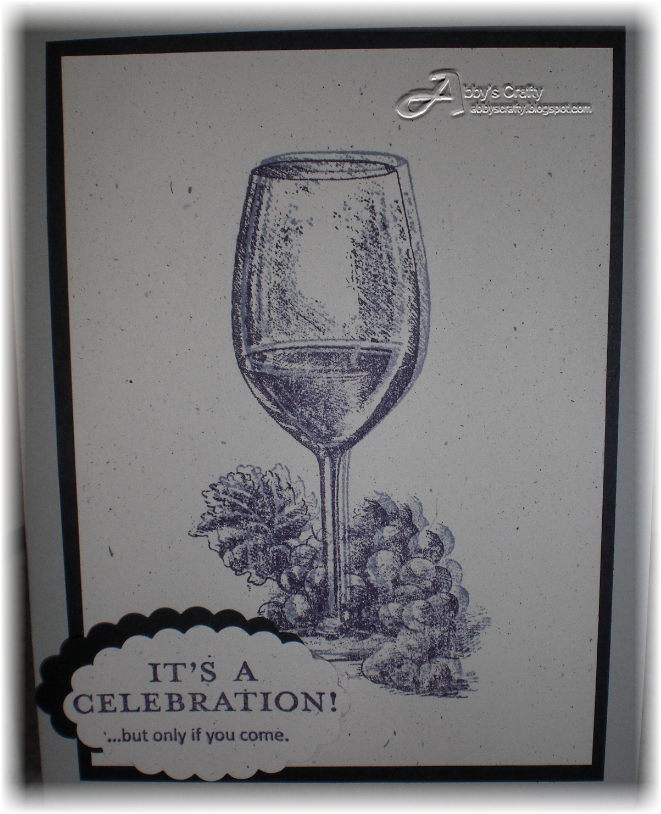
So I was to "case a card."  For those of you who don't know what that means, it's where you go find a card that you like, that someone else made, and "borrow" design elements from them. This is the card I chose to case"

It is from http://inkypaws.blogs.splitcoaststampers.com./  I also thought, wow...a BROWN christmas card, how in the world will I pull that off?!  Well, I'm pretty pleased with the result:

As you can see, I edge punched the black layer like in my inspiration card, and also used a similar stamp.  All the CS is Stampin' Up CS (Early espresso, basic black, and very vanilla) as well as the ink (early espresso).  The stamps, I'm not real sure about.  I believe the focal image was from a Michael's Recollections stamp set, and the sentiment was a $1 stamp. The border punch is Fiskars and the ribbon is just out of the scrap bin. I'm pretty sure the pin is Maya Road.

All that to say, that it didn't take me long at all to come up with this card! It REALLY helped me to narrow down what to include on the card.

On to the next project: Indexing stamps.

What am I talking about, you ask?  Well, I have more stamps than any person in their right mind should own.  I know you all know what I'm talking about. Well, I came to the point where I had so many, I forgot what I had or where it was. At the point when I started this project, I was still living in a small apartment, and needed to find a space that was expandable for all my stamps, but didn't take up much room.  I tried everything, binders, buckets, bins, wall storage...you name it, I tried it. Everything worked....ok.  But was either WAY out of my meager nursing salary budget, or wasn't expandable or took up too much room, or just plain didnt make sense.  So I developed my OWN system.  It may not work for everyone, but it's cheap, and expandable forevermore. 

Here's the system: 
1. Unmount all your wooden blocks, if you can't afford the space.  (I certiantly couldn't, and I found that a properly mounted stamp on EZ Mount, stamps just as well as a stamp on a wooden block, some people will disagree.  That's ok.  Don't do it.  I don't care.) You can usually just get your fingernail between the rubber and the foam and pop them right off.
2.  Remount rubber from wooden stamps onto EZ Mount.  You can get this at most scrapbook stores, and online.
3. stamp ALL of your stamps (that's right, ALL of them) onto what I like to call "index sheets."  Make sure you stamp them in the order, and position you want to store them in.  IE: all christmas stamps together, all of one manufacturer together, whatever works for you. This takes the longest and is the most tedious.  I got around some of this by using the index sheets from the actual stamp set and just taping it to a piece of white paper, but that also adds a step later (you will see what I mean in a second).
4. Scan in all of your index sheets to a computer. If you have a crappy computer like me, that in itself takes DAYS.
5.  Time to print! If you used the short cut in #3 (taping index sheets to a white piece of paper) make a plain old copy of those (this just prevents you having to muck with all the tape and pieces flopping about when you place your index in the sheet protectors.  If that bothers you.  It bothers me. If not, disregard.) Otherwise, take ALL of your scanned in images, and reverse them using whatever means available.  Some printers are snazzy and you can just tell it to print the "mirror image." This feature can usually be found in the ADVANCED properties section of the printer properties.  If not, you have to do it the long way. If all else fails, you can bring your image into microsoft word, blow it up to fit your page, and in the picture toolbar, you should have an icon that looks like two triangles with an arrow (rotate).  click that, and one should be a rotate horizontally (or mirror image, which is what every other program known to man calls it.)  Print those out (on cardstock.  regular printer paper works, but your sheets will be much sturdier with cardstock)!!!
6. If you have a lot of stamps, and not a lot of time, this is the point where you might want to pay someone to do some of the work.  Take those reversed images to kinko's (FedEx office, now I think) and have them laminated.  This is the magic of this storage idea.  Cling mounted stamps stick BEAUTIFULLY to laminated cardstock. So get to sticking all your stamps to your laminated cardstock. Now you see why we reversed the images, so when you stick your stamps to it, theyre all facing the same way. You could skip the scanning/reversing/sticking steps all together and just opt for a sheet of plain laminated paper.  However, I like being able to glance at my laminated sheets and see immediately which stamp is missing. But I'm a little crazy like that.
7. Get yourself a file cabinet.  Standard size.  Or those file crate thingys.  and some file folders.  Number and letter them in any order you choose.  use the dewey decimal system.  i dont care.  Just make up a system you can understand.  For example, I have a two drawer file cabinet and a file crate.  One drawer is A, one is B, and the crate is C.  The the folders within are numbered, A-1, A-2, etc...you get the idea. 
8.  Get yourself a binder.  I needed a BIG binder.  You may not.  And you will need some clear top loading sheet protectors.  Place your (non reversed) index sheets in the sheet protectors and label them, in some form or fashion, the same way you labeled the file folders in your cabinet/crate. That way, when you are looking for a stamp, you can look through your paper index, find what you need, and VOILA! its right where it's supposed to be.  No more sifting through HUNDREDS of stamps, having to try to look at everything backwards...etc.
9. You can take it a step further and catalog all of your Stampin Up stamps (I did, however I didn't stick mine to an index sheet, I just left them in their cool DVD cases, but I like being able to see all the images I have in one place). I indexed my dollar stamps as well.  Did you know those fit perfectly in baseball card holders?

Yes, this is a LOT of work.  But believe me, for the money and the ease of use, I haven't found a better way to do it.  I can see all of my stamps in less than a minute. If I'm looking for the PERFECT Merry Christmas, I can see at a glance every single Merry Christmas that I have.  Trust me, it's worth the work.

Ok enough about that. 

Did anyone catch that Craft Wars show (Tuesdays at 9c on TLC)?  Mom and I (and Justin, because we made him, lol) watched it last night.  It's like cupcake wars only with crafts. Could turn out kinda interesting.  I would like to do it, but I don't think I could think under pressure like that. Who knows.

Oh! project #3.

Me and Mom started a Stampin Up stamp club.  Currently we have 5 members.  It has been fun chosing cards for the group to make.  We're having our Christmas in July club in a few weeks, and already have the cards picked out for that!

Wow.  That was a long post.  Hope it was helpful to someone!!

Happy crafting to everyone, and hopefully I will be posting more often!

-Abby

Sunday, April 22, 2012

A Crafty Weekend

Have you ever invited 25 of your favorite crafty friends to your house for a weekend of crafting? Sounds pretty crazy, but boy, was it ever fun!!!

We started the weekend with some card make and takes, then moved quickly to making a tri-shutter album and conducting a Copic marker technique class...of course, there was plenty of food and drink the whole weekend. A fettucine alfredo dinner was provided by our wonderful husbands! They are such great sports.

After dinner we visited, worked on our own projects and worked with the cutting on the Cricut. Most of us have Cricuts, but it was fun to learn new ways to use this very powerful tool. We were enjoying ourselves so much, we did not realize it was getting late until 1:00am!

We began Sunday morning with breakfast on the patio on a beautiful Texas morning. Everyone worked on their own projects until the afternoon when we started our group projects with a Stampin' Up card make and take.

We finished the day with colored pencil/Gamsol coloring and Distress Ink and water coloring technique classes.

Now, on to storing all the crafting supplies...more to come from the weekend, we have pictures...lots of them...thanks to my wonderful hubby!

For all you participants, I'll post the link to the web album when I have the photos uploaded.

Happy Crafting!
~Kim

Sunday, February 26, 2012

Curtis Goes Fishin'

This card is my entry in the Kraftin Kimmie Challenge #117.  The card is made from Stampin' Up cardstock and features one of my favorite Kimmie stamps, Curtis.  I colored Curtis using my Copic markers and then embellished the card with some scrap designer paper I had with fishing lures on it along with some ribbon I purchased a while back from Eyelet Outlet.  Finally, I stamped the sentiment that comes with Curtis on some white cardstock inking around the edges and attached it to the card using Stampin' Up dimmensionals.

Have a great week!


Kim

Celebrate!

Abby and I have been crafting all weekend.  She made a wooden pen with her Dad last night.  It turned out to be a really cool result.  Here is a picture of the pen...


We have spent most of today sewing, but I finally got around to making a card for the Friday Free for All over at Stamp TV.  The theme is to make the focal image with a drop shadow.  Here is my attempt at making it look shadowed.  It sort of makes it look like you already began celebrating.  LOL!  At any rate, here is the card...


Have a great evening!

Kim

Saturday, January 21, 2012

Stamp TV Mix It Up Monday & CPS Challenge #251

This card is my entry for Suzanne's Stamp TV Mix It Up Monday challenge to make it LOVE-ly.  I used CPS Card Sketch #251 and created the card using some of my favorite items from Stampin' Up.  I love melon mambo and use this color as often as I possibly can!  It was a perfect color for this Valentine's Day themed card.  The card sketch looks like this:


I turned it sideways and came up with this card with a couple of twists on LOVE-ly!


I hope you enjoy the card!  Take a look around my blog for other card samples.

Happy Crafting!  ~Kim

Sunday, January 8, 2012

Stamp TV Free for All Friday Challenge

This challenge to create a baby card was a good one for me since I rarely create anything related to babies.  I used my favorite Stampin' Up color, melon mambo, and sprinkled in some pirouette pink for added interest.  I have been attempting to use my Cricut on most things so the Baby phrase is cut from the Cricut using the Cindy Loo cartiridge.  I hope you enjoy my card as much as I enjoyed creating it.

Kim

I'm Back....

Now that the holidays are behind us, it's time to get back to being crafty!  The following card is for the Kraftin' Kimmie Challenge #110.  The challenge was to use at least three different shapes per card.  I thought that Kimmie's brand new Alice in Wonderland stamps were perfect for this challenge given the character of this story.  I hadn't gotten to ink up the Cheshire Cat yet so I decided he would be purrr...fect!

I cut several shapes using my new Cricut Expression 2 (best Christmas present E-V-E-R) and then went to work on coloring the cat with my Copic markers.  I am REALLY enjoying working with my markers again after such a long time away...I think I"ll go try another challenge.  I hope you enjoy the cat...  :)  

Happy  Crafting,

Kim