Wow, it has been a long time since I have written anything in this blog!
We have been busily preparing for our annual Halloween bash at my house so no formal crafting, but I have been making all sorts of stuff for the party and the decorations for the party. I just love having my friends over for a party. The party was last night and we all eat and drank way too much but it was oh so much FUN.
I met some new crafting buddies and we have already decided we MUST have a crafting weekend at the house. I can't wait. I love sharing crafts with my friends. More to come....
Kim

"There is no life I know to compare with pure imagination." -Willy Wonka
Sunday, October 30, 2011
Monday, August 22, 2011
Halloween is Coming!
Hello Crafters!
Who loves Fall? Anyone that knows Abby and I know that Fall is our favorite time of year. You can visit our houses anytime during Fall and find tons of foilage, fall colors, and the scents of Autumn decorating the house. This week, Kraftin' Kimmie Stamps released their August release and it was full of Halloween images. I just couldn't resist ordering the whole collection! I cannot wait for them to arrive.
The following card is my card entry for the CPS Card Sketch #232 and this week's Kraftin' Kimmie challenge - Make it Spooky. The card sketch is below:

I started the card by cutting the base and then cutting a spider web from black using my Cricut and Wild Card cartridge. I then used some scrap halloween themed paper to cut the three background squares. Finally I colored my Kraftin' Kimmie stamp (Vic the Vampire) with my Copic markers and cut both the focal image and the focal image background using my Spellbinder Squares and my Sizzix Big Shot. To finish off the card, I added a few embellishments I found lying around in my embellishment case. I hope you enjoy it and Happy Crafting....maybe I'll keep making Halloween cards for a while...

Sunday, August 14, 2011
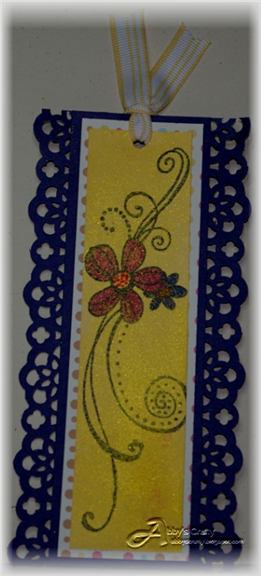
Bookmark!
Here's a change up! The Stamp TV team challenge for Friday Free For All featured a bookmark instead of a card. The challenge was to make any kind of a bookmark so I chose a traditional style.
I punched a border from Stampin' Up Elegant Eggplant cardstock using my brand new border punch from Stampin' Up. I am really liking this one! :) I then stamped an image on regular cardstock and colored it using my Memento markers. You saw that right, Mementos, not Copics...I'm kind of feeling like a rebel today.
I then sprayed the stamped image using my Gold Smooch spray to give it some glitz. I assembled the bookmark by layering a couple of layers and then attaching the punched border on either side of the base. I finished by punching a hole in the top and tying on a So Saffron ribbon. It was oh so quick, but still a fun challenge!
Kim
Simple Things
This is my card for the Gina K. Stamp TV Inspiration challenge for Mix it Up Monday. This is the inspiration photo:


Kim

This photo really makes me think of simple, lazy days in the rocking chair surrounding with bright and cheering things. In my card, I tried to capture this simplicity. I hope you enjoy it...

Kim
Kimmie Challenge #91
Hello everyone!
I wanted to show you all my entry for KKS challenge #91: Use a flower, ribbon and chipboard.
 I stamped the brand new CLEO (get her HERE) on Ginak K Designs Pure Luxury white cardstock and colored her with Copics and cut her out with a spellbinders scalloped circles die. Then I layered some basic brown cardstock with a piece of patterned paper from DCWV "Natural" stack and machine stitched around it. The embellishments are some random things I found in one of mom's drawers, along with a chipboard tag stamped with the word {love}. They tiny purple crystal at the bottom started out clear, and I colored it purple with a copic marker to go with the image.
Enjoy!
Abby
I wanted to show you all my entry for KKS challenge #91: Use a flower, ribbon and chipboard.

Enjoy!
Abby
The Places You Will Go...
Good Evening Crafty Friends!
Abby and I have had an exciting weekend. We had our monthly stamp club yesterday. We really had a good time. We made two new cards and a small box to hold candies. The candy box was a nice change of pace from all the cards.
It is hot again today in Dallas so we opted for staying in and crafting the majority of the day. Well, Abby is still trying to organize her stamps and I am crafting. LOL
This card is my entry for this week's CPS Sketch Challenge and Kraftin' Kimmie's challenge #91, which is a recipe challenge. The card should have 1 flower, 1 ribbon, and 1 piece of chipboard.
I colored the awesome Lucy, a Kraftin' Kimmie stamp, and cut her out closely to be able to place her over both of the layers of cardstock I had cut to mimic the sketch. Since Abby and I both love to read, this is the perfect stamp for us. She is most definately one of our favorite Kimmie stamps. I added a sentiment, bow, and chipboard tag which has a "hello" sentiment stamped on it.
It was really fun to create this card. I hope you enjoy it!
Kim


Sunday, August 7, 2011
Hugs
Good Evening Friends!
Abby and I have had a busy day today. We have been attempting to build some custom storage space for our Stampin' Up stamp pads, but we have failed miserably today...it just wasn't in the cards for us to get the product finished so, we decided to cut our losses and make a card for the Kraftin' Kimmie Challenge #90 - Distressed.
This card features the relatively new Cheryl Alger stamp from Kraftin' Kimmie, Friends Are for Hugging. I love this line of stamps and this is the first opportunity I have had to ink this one up. I began this card by distressing the first layer of cardstock, inked the edges with distress ink and then adding a nice designer paper.
I decided to paper piece the dress with the same designer paper and color the rest with my Copic markers. To go with the flower motif within the image, I cut a nice leaf pattern using my Sizzix and Sizzix dies and then I cut a scallopped oval to layer the focal image. I airbrushed a paper flower with red and yellow to match the color scheme and then applied glitter to the flower within the stamped image and the leaves I had cut with the Sizzix.
I hope you enjoy viewing the image as much as I enjoyed creating it. Happy Crafting!
Kim

Sunday, July 31, 2011
CPS Sketch #229 and Kraftin Kimmie Challenge #89
The following is my entry for the CPS Sketch #229 and the Kraftin Kimmie Challenge #89 - No Embellishments.
The sketch for CPS #229 looks like this:


The sketch for CPS #229 looks like this:

That's a pretty challenging sketch to begin with, but then when you add Kraftin Kimmie's Challenge #89 which requires a card with no embellishments....whew! that really gets you thinking...
So, I dreamed up this bright and cheery card using Kraftin' Kimmie's Nurse Nellie Stamp and a variety of Stampin' Up cardstocks and designer paper.
I first punched the right edge of the base card with my Martha Stewart punch to add interest to the card since I couldn't add embellishments. Next, I cut each layer from cardstock and designer paper following the sketch. I airbrushed some ink from my Copic airbrush (I love this airbrush!) around all the edges of the top layers I had cut using my Sizzix and my scalloped rectangle Spellbinders. Here's a tip: Spellbinders make a great mask for the edges of the layers when airbrushing.
I then added my focal image, Nurse Nellie, which I had colored using my Copic markers. Finally, I stamped my sentiment, which is a stamp from the Stampin' Up set, Curly Verses, with Cherry Cobbler ink from Stampin' Up (this is my current favorite ink color from Stampin' Up). I believe this set is retiring with the arrival of the new catalog so if you like it, you may want to see if it is still available right away!
All in all, I think the card works, even without embellisments. As you all know, I love my embellishments...this turned out to be a REAL challenge for me.

Thanks for looking!
~Kim
ATC Swap - August Swap posted tonight! Check it out!
Hey Everyone!
Don't forget to check out our monthly ATC swap Facebook page at http://www.facebook.com/#!/pages/Artist-Trading-Card-Swap-Dallas-TX/139336096125542. The inspiration this month is your favorite movie. Check it out and let us know if you would like to participate in upcoming swaps.
Thanks.
Kim
Don't forget to check out our monthly ATC swap Facebook page at http://www.facebook.com/#!/pages/Artist-Trading-Card-Swap-Dallas-TX/139336096125542. The inspiration this month is your favorite movie. Check it out and let us know if you would like to participate in upcoming swaps.
Thanks.
Kim
Sunday, July 24, 2011
CPS Sketch #228
It's been a while since I participated in the weekly challenge, but I am back! :)
The following is my entry for sketch #228:
 I used a blue color pallette and kept the card very simple. The single butterfly embellishment was added for contrast.

The following is my entry for sketch #228:


Thanks for looking and check out the rest of the blog for some great ideas!
Kim
Hello!
This is my entry for the Stamp TV Friday Free For All (STVFRICT5) to Case the Design Team. I used Carolina's card "With Love" and changed coloring, the message, and the embellishments to arrive at the design. Great challenge!
I cut the layers and then stamped the sentiment with Memento Tuxedo Black. I then colored the flowers using my Copic markers (very lightly since this paper wasn't ideal for Copics). I added some glitter accents on the sentiment and then cut the layers using my Spellbinders and Sizzix. Finally, I added a ribbon to the bottom strip layer and pushed a stick pin with a heart on it through the tied part of the ribbon before assembling the card using standard scrapbooking adhesive.
 Thanks for looking! Take a look around the blog while you are here....There's some great ideas that's been posted.
Kim
I cut the layers and then stamped the sentiment with Memento Tuxedo Black. I then colored the flowers using my Copic markers (very lightly since this paper wasn't ideal for Copics). I added some glitter accents on the sentiment and then cut the layers using my Spellbinders and Sizzix. Finally, I added a ribbon to the bottom strip layer and pushed a stick pin with a heart on it through the tied part of the ribbon before assembling the card using standard scrapbooking adhesive.

Kim
ATC Swap
Hey Crafters!
We will be posting a new ATC swap on our Facebook page tonight. Hop on over there and take a look...http://www.facebook.com/home.php#!/pages/Artist-Trading-Card-Swap-Dallas-TX/139336096125542. We would love to have you join in. :)
Kim
We will be posting a new ATC swap on our Facebook page tonight. Hop on over there and take a look...http://www.facebook.com/home.php#!/pages/Artist-Trading-Card-Swap-Dallas-TX/139336096125542. We would love to have you join in. :)
Kim
Thursday, July 21, 2011
You've come a long way baby...
WOW people. It has been over a MONTH since our last post! Abby here, and as you might have noticed I have been MIA from the crafting world for a while, and I am SO HAPPY to be back! Here's what's been going on:
First of all!
Me and my wonderful hubby, Justin moved to Addison. Let me just say- it was a fiasco getting moved, but I am so happy we did. MUCH closer to work for both of us...but (and I'm sure all you crafters out there will really appreciate this one...) the best part is...I get my OWN ROOM for crafting! I finally got to move out of my cozy nook in the old apartment. So here is why I have been MIA:


 Ok here's where I cleaned out an area for assembling my custom made by daddy craft tables.
 Here's after we got my custom tables in the room. the one with the sewing machine is 30" tall: shorter than your average desk to make it more comfortable to sew on. the taller one is 35" : perfect for standing to craft/color.
 ah yes. this is my dearest husband. being such a good sport and hanging ALL those shelves for me. Note: those things are put in with the toughest duty sheetrock anchors there are. I could probably hang off of them. craft stuff is HEAVY (paper in particular). I have already had one accident in the old apartment where one of my shelves, and everything on it, fell off the wall onto me, unsuspecting, below. luckily, none of my craft stuff got hurt. :-P

First of all!
Me and my wonderful hubby, Justin moved to Addison. Let me just say- it was a fiasco getting moved, but I am so happy we did. MUCH closer to work for both of us...but (and I'm sure all you crafters out there will really appreciate this one...) the best part is...I get my OWN ROOM for crafting! I finally got to move out of my cozy nook in the old apartment. So here is why I have been MIA:

AHHHHHH! WHAT THE HECK AM I SUPPOSED TO DO WITH THAT?!?!?! There's floor under there, at least that's what the apartment people told us. At this point I was reserving judgment. You can see in the back my lonely little black and white Ikea desk on which I did all my crafting at the old apartment, and that's what I'm typing this post on right this second.
So about two weeks of time was spent unpacking. everything. my poor craft room was our storage area for a while so we could at least LIVE in the rest of the apartment. With both of us working full time and sometimes overtime, it's very hard to get unpacked. But here's the progression...

AHH the floor! I told you it existed!


Ok here it is thus far. still a work in progress. I plan to make very basic black curtains to put around the storage areas in the tables to clean it up a bit. I need two more wire curtain rods (thin wire above the taller table) to hang my cards and ATC's from. I also need to decorate it up a bit. it isn't very inspiring right now...but soon enough it will be. I'll keep updating to this blog.
So where have I been otherwise?
Well, Mom and I just came back from Houston. and we didn't just go to see the sights. (it was 105 and about a billion percent humidity). We went to get COPIC CERTIFIED!!
So please note our new little blinkie on the sidebar, and if you live in the Addison TX area and want a copic class, let me know!
It was really a great class with Jen Balcer. We learned new techniques, perfected the ones we already knew, and most of all: got to play with the airbrushes!
which! by the way...the ABS-3 airbrush set is on clearance at Hobby Lobby for $22!! Of course, you need a compressor with that set, but having played with both the compressor and the air cans, I would DEFINATELY recommend a compressor.
Anyways, I almost have my craft room workable...just in time to have to work three days in a row! of course. :-(
Have a great night and stay cool!
-Abby
Monday, July 4, 2011
Rosabelle
Happy 4th of July!
This magical little girl is Rosabelle. She is from the Kraftin' Kimmie stamp collection. I have created this card for the CPS Card Sketch #225.
![]()
This was a great sketch to really get you to thinking about the colors you are matching together.
I started with a olive green card base and then added a second layer of ligher green and rounded all four corners for layer #1. I colored Rosabelle using my Copic markers. I selected a couple of the colors that I used in the image as the square layers behind the focal image. I then chose a bright pink to coordinate with the inked edges I place around Rosabelle. I think that really makes the image pop out from the card. I used my white glaze pen on Rosabelle's eyes to give them a bit more dimmension. Finally, I added eyelets to each corner of the focal image.
I hope you enjoy her....she was a blast to create! Have a great day!
Kim
![]()
This magical little girl is Rosabelle. She is from the Kraftin' Kimmie stamp collection. I have created this card for the CPS Card Sketch #225.

This was a great sketch to really get you to thinking about the colors you are matching together.
I started with a olive green card base and then added a second layer of ligher green and rounded all four corners for layer #1. I colored Rosabelle using my Copic markers. I selected a couple of the colors that I used in the image as the square layers behind the focal image. I then chose a bright pink to coordinate with the inked edges I place around Rosabelle. I think that really makes the image pop out from the card. I used my white glaze pen on Rosabelle's eyes to give them a bit more dimmension. Finally, I added eyelets to each corner of the focal image.
I hope you enjoy her....she was a blast to create! Have a great day!
Kim

Sunday, June 26, 2011
Hoppy Hello!
This card is my entry for the Friday Free for All at Stamp TV. The challenge was to pick a design in the gallery of a selected Gina K. Design Team Member and copy it, changing at least two of the elements in the card. I chose the Nuts for You card created by the selected designer. I then changed the stamp and the color theme to create this design. I hope you enjoy it. Take a look around.... Abby and I have created a ton of cards and we love to share them!
Abby is busy working with Shrinky Dinks and stamps. It's quite an interesting medium. Check back for more info and photos of the results!
![]()
Kim
Abby is busy working with Shrinky Dinks and stamps. It's quite an interesting medium. Check back for more info and photos of the results!

Kim
Monday, June 20, 2011
Cupcake Cory
The following is my entry for the weekly CPS card sketch #223 and the Kraftin' Kimmie Challenge #83 - Cards for Little Peeps.
![]() The card was made with Stampin' Up cardstock and scrap designer paper for the layers. I cut Layer #1 from scrap paper using my paper trimmer, then cut layer #2 using my Fiskars shape cutter. Both layers corners were rounded.
The card was made with Stampin' Up cardstock and scrap designer paper for the layers. I cut Layer #1 from scrap paper using my paper trimmer, then cut layer #2 using my Fiskars shape cutter. Both layers corners were rounded.
The sweet little baker in the focal image is Cupcake Cory from Kraftin' Kimmie stamps. This is the first time I have used her on a card, but I like! :) I colored her using my Copic markers then cut her into a square using my Classic Square Spellbinder dies and my Sizzix Big Shot. I cut the second sentiment using my deckled rectangles dies from Spellbinder. Yep, you guessed it...I love Spellbinders!!!
As a final glitzy touch I added some coordinating Imaginesence Hot Rocks using my heat setter tool to the corners of the final layer.
I hope you enjoy viewing this card as much as I enjoyed making it. Please take a look around this blog and leave a comment or two. My daughter and I have created many varieties of cards and we love to share them with everyone!
![]()
Have a great week!
Kim

The sweet little baker in the focal image is Cupcake Cory from Kraftin' Kimmie stamps. This is the first time I have used her on a card, but I like! :) I colored her using my Copic markers then cut her into a square using my Classic Square Spellbinder dies and my Sizzix Big Shot. I cut the second sentiment using my deckled rectangles dies from Spellbinder. Yep, you guessed it...I love Spellbinders!!!
As a final glitzy touch I added some coordinating Imaginesence Hot Rocks using my heat setter tool to the corners of the final layer.
I hope you enjoy viewing this card as much as I enjoyed making it. Please take a look around this blog and leave a comment or two. My daughter and I have created many varieties of cards and we love to share them with everyone!

Have a great week!
Kim
Sunday, June 19, 2011
Wear Your White
This simple and friendly card is my entry for the Gina K. Mix it Up Monday challenge - Wear Your White. I used all scrap paper in designing this card and Stampin' Up ink. The Scalloped Circle was cut using my Spellbinder Petite Scalloped Circle Dies and my Big Shot. I embellished the card using a white button for the center of the flower and created a white buterfly with white pearl accents to complete the requirement for embellishing with white. I hope you enjoy the card!
Have a great week!
Kim
![]()
Have a great week!
Kim

Tuesday, June 14, 2011
Kraftin' Kimmie June Release
Has everyone checked out the June release of Kraftin' Kimmie stamps? I am going to order mine now! They are terrific! These are some of my favorite stamps to color with Copics!
http://www.kraftinkimmiestamps.com/
http://www.kraftinkimmiestamps.com/
Monday, June 13, 2011
Spellbinders
Good Morning Crafty Friends!
Anyone reading this blog will know that Spellbinders are one of my favorite tools in paper crafting. I love them and have a large number of them hanging about which sometimes makes storing them and finding the perfect one a challenge at times.
Does anyone else have challenges storing these great little metal dies?
While Abby and I were at the GASC in Arlington, Texas about a week ago, we discovered a terrific idea for storing this treasures in a neat and convenient way and we wanted to share it on our blog. We have adapted the idea to better fit the way we craft and I am sure you can all think of great enhancements as well.
We went to Home Depot and purchased magnetic heater vent covers. These items are around $5.00 for three covers and can be found near the venting/air conditioning supplies in the store. We cut them into three sections of 5 inches each. The pieces measure around 5 x 8 inches and they make a perfect place to attach all the dies of one set. Ours were a little flimsy so we took the card stock that comes in the package with the covers and also cut it into the same dimmensions. Then, we used our ATG to adhere the magnetic sheets to the card stock. To finish it off, I covered some additional card stock cut into cover sized pieces with some pretty designer paper (because that is what paper crafters do, cover everything we can in pretty paper!) and then bound the book using my Zutter and a 1" binding wire.
Now I have a wonderful little book that I can turn pages and have my Spellbinders close at hand. Let me know if you try this tip and how it turns out. I'd love to hear any tips you have as well!
Happy Crafting.
Kim
Sunday, June 12, 2011
Challenge Card for Kraftin Kimmie #82 and CPS Sketch #22
Good Evening Friends,
Abby spent the weekend with me, but we didn't get to craft as much as we wanted. We had to celebrate Grandma's birthday on Saturday. On Sunday, we went for a mani/pedi and that took for-EVER and that really cut into our crafting time. We have decided we are going to devote some extra time to crafting over the next few weeks to get caught up with all our challenges.
The following is my card for the CPS card sketch #222 and it also fits with the Kraftin Kimmie challenge #82, which was to add a splash of gold to the card.
I actually made the card for a friend. Her husband is in the hospital and she has been a bit down. I am going to send the card to her to wish her well. She is a cross-stitcher...I bet she has been stitching away during those long hours of caring for her husband. I hope he gets better really soon. I miss seeing her every day.
This card was made using Stampin' Up Ivory Cardstock as a base and then I added some pink cardstock and a piece of blue stock with that splash of gold as 2nd and 3rd layers. I embossed the pink stock with my Sizzix Big Shot and a circles embossing folder. For the focal image I colored Goldilocks from the Kraftin' Kimmie collection with my Copic markers. This is the first time I have used this stamp, but I bet it won't be the last. ;-) On the interior, I colored a small bear with my Copic markers, cut it out closely, and then affixed it with a message saying "thought you could you a little pick up!" As a final touch, I rounded all four corners with my corner rounder punch.
Kim
CPS Sketch #222


Monday, May 30, 2011
A Card for the Man in Your Life
The following is my entry for the CPS Card Sketch #220 as well as the Stamp TV Free For All Friday Challenge to create a masculine birthday card.
Here is the CPS Card Sketch #220 from which I based my card:

I used Stampin' Up cardstock as my base and my layers and then added World Map designer paper as my second layer. This was from my scrap paper so I am not sure who made it. I then cut a small square of the same Stampin' Up cardstock and rounded the corners for my third layer and for the fourth layer, I stamped the writing image from the Open Sea stamp set from Stampin' Up to cover the entire piece of ivory cardstock I cut from Stampin' Up scraps with Crumbcake ink from Stampin' Up. I then placed the ship image from the Open Sea stamp set for the focal image with Rich Cocoa Memento ink.
To finish the card I set eyelets at each side of the focal image and then pulled some baker's twine through the holes and tied a knot. Finally, I added the sentiment with dimmensional dots.

Thanks for looking! Have a great week! Abby and I are headed to Arlington for the GASC show on Friday. Maybe we will see you there!
Kim
Stripes
Good Memorial Day!
I hope everyone has had a wonderful and crafty Memorial Day...
The following is my entry for this week's Kraftin' Kimmie Challenge and the Stamp TV Mix it Up Monday Challenge. I love to sew, but I never have been good at sewing by hand so this one presented me with quite the challenge!
I created the card using Stampin' Up cardstock and then hand sewed along the right edge of the background using a blanket stitch. For the focal image, I colored Stripes from the Kraftin' Kimmie collection using a mixture of Copic markers and Primacolor pencils and then affixed him to the card using Stampin' Up dimmensionals. The bow was tied using my Bow Easy. If you don't have one of these handy tools, believe me, they are worth the $5 unless you are exceptionally gifted at bow tying.
Happy Crafting!
Kim

Wednesday, May 25, 2011
My first Copic picture
Good evening crafty friends!
I just finished my very first full page digi stamp colored with my Copic markers. It took me two evenings to finish it, but I think it turned out pretty good. I am thinking I will frame it and put it in my craft room. What do you think?
Kim

- Posted using BlogPress from my iPhone
I just finished my very first full page digi stamp colored with my Copic markers. It took me two evenings to finish it, but I think it turned out pretty good. I am thinking I will frame it and put it in my craft room. What do you think?
Kim

- Posted using BlogPress from my iPhone
Sunday, May 22, 2011
Abby's Stampin'
Abby and I got to go to our monthly stamp club this weekend! We sure do love hanging out with those ladies!!
I just had to show the cards we made in the club. This is a Stampin' Up club so we obviously used all Stampin' Up products. They are such wonderful products and we just love our demonstrator, Sandy Jordan. We always have wonderful food, cards, entertainment, and socializing when we attend the monthly club and can't wait for the next one...
Enjoy...
Kim

Kimmie Challenge #79
Hello Crafty Friends!
Abby here. Well, after another fun filled weekend of crafting with my mom, I have some cards to show you!
Not as many as usual. I got to go to the races with my husband and his parents yesterday. The first time I have ever bet on horse races! Sadly, I still have to go to work this week, I didn't hit it big, beginner's luck notwithstanding. I did get to bet on the Preakness, however, which was pretty cool! All that to say, I had one day less than usual to craft, so here is what I have gotten done today:
For the Kraftin' Kimmie Challenge number 79-Text me!
 I started with a SU certainly celery card base. I then took some scrap cream colored cardstock and stamped all over it with the SU "define your life" stamps to satisfy the text requirement. I added some green ribbon, and a stamped and colored "Isabelle" image. I just LOVE this fairy kit, don't you? The "wish" sentiment came with a different fairy, also Kraftin' Kimmie. On the inside is the SU "wish" definition stamp. I really liked the copic coloring on her hair, I've been working really hard at getting better at coloring.
My next card is for the Gina K Designs "Mix it up Monday" focus on flowers! I used the "black magic stamping" technique for this card. See the tutorial HERE on SCS. It is very simple, but effective.
 I definately looks like I had a few too many drinks when I stamped that sentiment, as it leans to the side a bit. Oh well I guess. The stamps are all from the "Just believe" SU stamp set. The cardstock is all scraps from my mom's box.
My next card is for the Gina K Designs "Free for all Friday" challenge-Get Krafty! ...sounds familiar right?
 I started this card with a Kraft base, and the focal image is actually a stamp. I just LOVE Leonardo da Vinci, so I just HAD to have this stamp. Although it is a father's day card, I certainly won't be giving it to my dad, because I know the first thing he would say is "You're giving me a card with a naked man on it?" lol. And who could blame him? I just liked the image and needed a father's day card, so here it is. haha. Anyways, this one is pretty self explanatory. I did cut off the right most 1.5" of the front flap to add a little bit of interest. The "world" stamp is from SU-The Open Sea.
One more card-and that is for the CPS sketch. Here is the sketch:
 ...and here is my card...
 This is a image I had already colored up from earlier this week. I know it looks like Halloween, but I do love that color combo any time of the year. Plus, I would be happy if it were fall year round! It's a little hard to see but the 2nd black layer is cuttlebugged with a circlely dot embossing folder thingy. I don't know what it's called. Obviously.
Well, hope you all enjoyed looking at my cards. I sure did enjoy making them. See everyone back here next weekend!
-Abby
Abby here. Well, after another fun filled weekend of crafting with my mom, I have some cards to show you!
Not as many as usual. I got to go to the races with my husband and his parents yesterday. The first time I have ever bet on horse races! Sadly, I still have to go to work this week, I didn't hit it big, beginner's luck notwithstanding. I did get to bet on the Preakness, however, which was pretty cool! All that to say, I had one day less than usual to craft, so here is what I have gotten done today:
For the Kraftin' Kimmie Challenge number 79-Text me!

My next card is for the Gina K Designs "Mix it up Monday" focus on flowers! I used the "black magic stamping" technique for this card. See the tutorial HERE on SCS. It is very simple, but effective.

My next card is for the Gina K Designs "Free for all Friday" challenge-Get Krafty! ...sounds familiar right?

One more card-and that is for the CPS sketch. Here is the sketch:


Well, hope you all enjoyed looking at my cards. I sure did enjoy making them. See everyone back here next weekend!
-Abby
Stamp TV - Friday Free For All
Here is my entry for Stamp TV's Friday Free for All - Let's be Krafty.
I didn't want to use kraft paper for the base because I would just have to cover it up and well, what's the use of that?

I selected a nice blue scrap piece I had to make the base. I then cut strips of green and green plaid from scrap and attached them together. I embossed a "Happy Father's Day" sentiment on the upper right corner using my fav - a la mode copper embossing powder.
I then cut a piece of kraft cardstock and stamped the truck from the Stampin' Up stamp set, Countryside. I have had this stamp set for months and never found a place to use it. You all know how much I love Copic markers, but for this image, I decided to try my Prismacolor pencils. I like the results!
I colored the image with the Prismacolors and attached it to the previously attached strips. I cut the bottom of the truck image to size, then attached it to the card.
All-in-all this was fun project. I am amazed how many cards I can make from my scrap bin. I have been challenging myself to use those scraps first. I am getting overrun with them...I know you all know what I mean. :)
Abby will be posting her challenge cards next....I can't wait to see what she has in store for us!
Kim
Stamp TV - Mix it Up Monday Challenge
The following is my entry for the Stamp TV Mix it Up Monday challenge - "Flowers".
I chose scrap cardstock from Stampin' Up to make the card base. I then added another scrap piece of rose pink Stampin' Up cardstock for layer #2. I wanted some flowers on the third layer so I chose a scrap piece from DCWV's Black Currant stack.
I added a pink organza ribbon and stamped a "thanks so much" sentiment from Stampin Up's hostess stamp set, "Swirls and Curls Verses" with Versamark and embossed with pink al la mode embossing powder. I cut the sentiment using my labels die from Spellbinders and attached it to the card using Stampin' Up dimmensionals. To finish the card, I added a Jolee Dimmensional flower sticker to the bottom of the sentiment.

CPS Card Sketch #219
Using this week's card sketch...


...I created the following Father's Day card.
I used Stampin' Up Not Quite Navy Cardstock for the base and then added a layer from DCWV's Lemon flower stack. I embossed a scrap of a coordinating yellow with my Sizzix and plain embossing folder then added a navy ribbon across the center.
To create the focal image, I stamped the sailboat from my brand new Stampin' Up's The Open Sea stamp set and added the "Best Dad Ever" sentiment from Stampin Up's Best Dad Ever stamp set on a scrap of ivory cardstock. I colored the sails of the boat using my Gelly Roll White pen. (Have you ever used your souffle' pen instead of your gelly roll when you meant to reach for your gelly roll? Let me tell you, it is not pretty!)
Finally, I put the card all together with scrapbooking adhesive and added the focal image with Stampin' Up Dimmensionals.
For ease of writing inside the card, I added a panel with "Happy Father's Day" stamped on it in the lighter ivory color.
Happy Viewing!
Kim

Kraftin Kimmie Challenge #79 - Text Me
Abby and I have been really busy crafting today! We are making some Father's Day cards to display on our Etsy shop and working to improve our Copic marker skills. We will be posting some stuff to the shop later today, but for now, the following is my entry for the Kraftin' Kimmie Text me challenge this week. The challenge is to use text somewhere on the card so here it is...

This sweet little summer gal is Olivia. I created this card by selecting the card base from Stampin' Up In Color Peach Parfait. I then added a second layer of pattered paper from DCWV's Citrus Paper Pad. Finally, to satisfy the requirement for text, I embossed a piece of yellow scrap using my Sizzix and my Cuttlebug embossing folder with writing all over it and placed it as the 3rd layer of the card.
I colored the focal image with Copic markers and then cut out a scalloped oval of the same Stampin' Up In Color Peach Parfait paper. For the sentiment, I stamped the sentiment that comes with the stamp, "Orange you a great friend!" and cut it out using my ribbon tag die and my sizzix. I placed the sentiment on the card using the ribbon that inspired this entire card. I don't know who made that ribbon, but I saw it at Hobby Lobby and immediately thought of this stamp.
I hope you have as much fun viewing this card as I did creating it. This is one of my favorites so far...next to Drucilla of course! ;-)
More to follow later today!
Kim
Thursday, May 19, 2011
CPS Card Sketch #218

I found all the squares already cut from scrap cardstock and I punched the circles using some scrap Graphic 45 paper I found. I stamped the focal image using my Tim Holtz 'Enjoy the Journey' stamps. The sentiment was stamped from my brand new Stampin' Up Best Dad Ever stamp set. Finally I added square brads to stay with the square theme and put it all together on my card base.
I hope you enjoy it!
Kim

Monday, May 16, 2011
DIY Patterned Paper - Stamp TV Free For All Friday
This is my entry for the Stamp TV Free For All Friday challenge to create do-it-yourself paper and use it in a card.
For this card, I used Stampin' Up cardstock for the base and then cut a piece of ivory cardstock for the second layer of the card. I used my two step stamp set from Stampin' Up named "Baby Blossoms" to create the floral pattern on this cardstock. I then stamped a "Congratulations" sentiment on a scrap piece of cardstock and inked the edges to match the pink floral pattern. I attached a ribbon and some brads in the corners of the sentiment to finish the card off.
I like creating my own patterned paper. Perhaps, I'll try a different pattern next time!
Happy Crafting!
Kim

Sassy Drucilla
This card is my entry for the Kraftin Kimmie Girls Rock challenge.
The focal image is Drucilla. She was my first ever Kraftin' Kimmie stamp and she remains my favorite! To create the card, I used Stampin' Up cardstock for the base and a pretty patterned dot print for the 2nd layer. I cut Drucilla out using my Spellbinders petite ovals and then placed glitter accents on her hair bows, barettes, and around her feet using my Atyou Spica glitter pens. I also added some flower buttons on the top left.
I hope you enjoy Drucilla as much as I do...I'm sure you will be seeing her often on this blog!

Happy Crafting!
Kim
Friday, May 13, 2011
Stamp Tv - Mix it Up Monday (Purples)
This card is my entry for the Mix it up Monday Challenge on Stamptv.com.
The card base is made of Stampin' Up Elegant Eggplant smooth cardstock. The second layer was created from white cardstock and inked around the edges with Stampin' Up Elegant Eggplant ink. The final layer is two different designer papers from DCWV. One layer was cut away at an angle to reveal the other layer.
The focal image was colored using Copic markers and glittered using Copic Atyou Spica glitter markers. I cut the image with my Spellbinders Petite Scalloped ovals. (I know, I know...I always use these, but I absolutely love this design!)
Finally, I inked a piece of white cardstock with the same Elegant Eggplant to place into the interior of the card for easy writing of a special note.
This card will be for sale in our etsy shop at http://abbyscrafty.etsy.com/. Remember to KRAFTYSALE through May 20 to receive free shipping on any purchase.
Happy Crafting!
Kim

Wednesday, May 11, 2011
Thanks a Latte!
This is my entry for the CPS Sketch #217 and the Kraftin' Kimmie Challenge # 77. I created this Krafty card using the following supplies:
Stampin' Up Cardstock Crumbcake (that's the Kraft-y part!)
Stampin' Up Cardstock Pumpkin Pie
Patterned paper by DCWV
Kraftin' Kimmie Angie Stamp
Copic Markers
Fiskars Corner Punch
Spellbinders Deckled Edge Die
Spellbinders Ribbon Tags
Miscellenous Embellishments
The card will be for sale on our etsy shop at http://abbyscrafty.etsy.com/. Check out the shop...There are lots of great cards to see! Enter coupon code KRAFTYSALE for free shipping...through May 20, 2011.
Kim

Sunday, May 8, 2011
Kraftin Kimmie Challenge
Hello all crafty people!
Well, I missed the Kraftin Kimmie Challenge to use flowers. I even had my card made, I meant to post it last night, but I was feeling so under the weather that I just went to bed. Now that I'm feeling much better (if not just a little hung over from the Benadryl I took last night) I saw the next challenge is to use KRAFT paper. Some people love it, some people hate it. I just so happens that I LOVE kraft paper. It also just so happens that the card I made for the flowers submission is on kraft paper! WooHoo! So here it is:
 I made the card with kraft cardstock. I colored my Kraftin Kimmie Abigail Apple (get it HERE) and cut it out with my new spellbinders petite ovals. I embellished it with some flowers that I got in a grab bag from Stampin Up and some ribbon from Hobby Lobby, I believe. Overall, not my favorite card that I have ever made, but I suppose it will do. Now on to the next challenge....
Visit our Etsy shop! We're being featured on the Paper Goods home page! http://www.abbyscrafty.etsy.com/!!!
Like us on facebook!
And...HAPPY MOTHERS DAY TO ALL THOSE MOTHERS OUT THERE!!!
-Love, Abby
Well, I missed the Kraftin Kimmie Challenge to use flowers. I even had my card made, I meant to post it last night, but I was feeling so under the weather that I just went to bed. Now that I'm feeling much better (if not just a little hung over from the Benadryl I took last night) I saw the next challenge is to use KRAFT paper. Some people love it, some people hate it. I just so happens that I LOVE kraft paper. It also just so happens that the card I made for the flowers submission is on kraft paper! WooHoo! So here it is:

Visit our Etsy shop! We're being featured on the Paper Goods home page! http://www.abbyscrafty.etsy.com/!!!
Like us on facebook!
And...HAPPY MOTHERS DAY TO ALL THOSE MOTHERS OUT THERE!!!
-Love, Abby
Subscribe to:
Posts (Atom)