Hello all!
Abby here.
Well, my plan today was to go to the bank (funny story about that in a second), go get some groceries and come home and craft.
So off I went to the bank. You see, I lost my debit card about a week ago. I specifically remember the last time I used it at McDonald's and put it in my purse. I remember thinking "I'm going to put this card in a weird place in my purse instead of taking the time to put it where it goes, and I'm going to forget where I put it." you would think that if that thought actually goes through my head, that I would actually stop and really put it where it belongs, but no, I ignored the angel on my shoulder and that brings me to today, sitting in front of my banker, canceling my debit card (after turning my house, and purse, upside down looking for the darn thing). Well, I was like yeah, go ahead and cancel it, but let me just check ONE MORE TIME in my purse. Lo and behold, there it sat. In the first place I looked, where I had thought it had been the whole time. Don't ask why I didn't see it the first 15 times I looked. Anyways, I'll have to get mom to share her story about losing her debit card in the next post. Let's just say at least I didnt get all the way to canceling it.
So then I go to the grocery store. Some teenager who thinks he's a real hot shot insults me, then says "I hope you arent offended, next thing you'll be doing is going to my manager..." if he wasn't socially awkward to start with, thats probably exactly what I would have done.
So I get home, and decide to do some spring cleaning.
Two loads of dishes, and three full trash bags later, dinner (and dessert!) are in the oven, and time has gotten away from me. Of course , I have to work tomorrow so working into the night isn't in the plan tonight. I'm off Monday and Tuesday, so tune back in for some crafts.
For now, I'll leave you with the recipe for the dinner I cooked tonight:
From the Taste of Home Comfort Food Diet (yes, you heard right, DIET!)cookbook,
CHEESY RIGATONI BAKE
Nancy Urbine, Lancaster, Ohio
1 16 oz pkg of Rigatoni
2 tbsp butter
1/4 c flour
1/2 tsp salt
2 c milk
1/4 c water
4 eggs, lightly beaten
2 cans tomato sauce, 8oz each
2 c part skim mozzarella cheese
1/4 c grated parmesan
Cook pasta according to package directions
Meanwhile, in a. Small saucepan, melt butter. Stir in flour (have a whisk ready!) and salt until smooth; gradually add milk and water. Bring to a boil; cook and stir for 2 minutes or until thickened. (mine didn't thicken, I had to mix some flour in about 1/4 milk and add it back in, bring to a boil again, usually works well)
Drain pasta, place in large bowl. Add eggs. Spoon into 9x13 baking dish. Top with tomato sauce, white ssauce, mozzerella cheese and parmesan.
Bake uncovered at 375F for 30-35 minutes or until thermometer reads 160F.
Alternatively, you can split everything in half and freeze one casserole for up to three months.. Thaw it in the refriderator over night and bake 7-10 minutes longer.
Happy crafting....and eating!!!
Abby

"There is no life I know to compare with pure imagination." -Willy Wonka
Saturday, April 30, 2011
Wednesday, April 27, 2011
Kraftin' Kimmie CPS Challenge
Friends,
I created this 6x6 card for the Kraftin' Kimmie CPS Challenge.
I used Stampin' Up cardstock to create the base and then added a patterned background paper from DCWV. The focal image is the Emelia stamp from Kraftin' Kimmie stamps and has been colored using Copic markers. The image was cut using my Spellbinder Deckled Edge rectangle dies and my Sizzix. The edges were inked with Pumpkin Pie ink from Stampin' Up.
The card will be listed for sale on our Etsy shop. Check it out...
Happy Crafting!
Kim

Sunday, April 24, 2011
Stamp TV STVCSP21
Hello again readers!
I have another card for you!
This was the card I made for the Gina K Designs Stamp TV Color Spotlight Challange 21 using bubblegum pink, lemon drop, and white.
 This was a pretty generic card. I used the "thumping" technique from Gina K. See the tutorial HERE.
I cut out the focal image with my spellbinders petite ovals, which, by the way, in case you're wondering, the spellbinders PETITE OVALS are actually larger than the CLASSIC OVALS. They're wider in the middle, and more suited to cutting out focal images. The classic ovals are narrower and sometimes it's hard to fit your focal image in them.
I tied my bow with my bow-easy (also a Gina K tool, find it HERE). It's a really great tool to have, makes perfect bows every time.
On a side note:
As if we don't have enough going on around here, Mom and I host an ATC swap. We try to hold one about every week. This week's theme is DOGS. You can "like" our page on facebook HERE. We would love to have you join our swap!
As always, I would like to direct your attention to the right hand side of your page, where you can find our Etsy shop. I say, go look, go buy.
Ok, that's all for tonight folks!
Have a good week, thank goodness I don't have to go back to work until Wednesday!
-Abby
I have another card for you!
This was the card I made for the Gina K Designs Stamp TV Color Spotlight Challange 21 using bubblegum pink, lemon drop, and white.

I cut out the focal image with my spellbinders petite ovals, which, by the way, in case you're wondering, the spellbinders PETITE OVALS are actually larger than the CLASSIC OVALS. They're wider in the middle, and more suited to cutting out focal images. The classic ovals are narrower and sometimes it's hard to fit your focal image in them.
I tied my bow with my bow-easy (also a Gina K tool, find it HERE). It's a really great tool to have, makes perfect bows every time.
On a side note:
As if we don't have enough going on around here, Mom and I host an ATC swap. We try to hold one about every week. This week's theme is DOGS. You can "like" our page on facebook HERE. We would love to have you join our swap!
As always, I would like to direct your attention to the right hand side of your page, where you can find our Etsy shop. I say, go look, go buy.
Ok, that's all for tonight folks!
Have a good week, thank goodness I don't have to go back to work until Wednesday!
-Abby
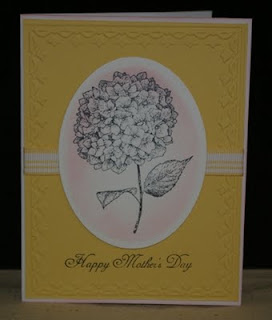
Stamp TV Color Challenge STVCSP21
This is my entry for the color spotlight challenge on stamptv.com this week. I began this card using white cardstock for my base. I then cut a piece of So Saffron Stampin' Up cardstock to fit the card base and ran it through my Big Shot Sizzix with the Tulips embossing folder from Stampin' Up. I used my Stamp-a-ma-jig to place the "Happy Mother's Day" sentiment. (If you don't have a Stamp-a-ma-jig, I highly recommend it. It is also one of my favorite tools.)
For the focal image, I stamped the flower from the Stampin' Up stamp set, Because I Care. I liked this image as black and white, so to add in the pink color for the challenge, I first cut the card using a classic oval die from Spellbinders and then inked around the edges of the focal image as well as the base cardstock with Pink Pirouette ink from Stampin' Up. To complete the card, I added a small length of So Saffron ribbon to the middle of the card behind the focal image and attached the focal image with dimmensionals. I then placed the entire creation on the card base using scrapbooking adhesive.
This card will be for sale in our etsy shop at http://abbyscrafty.etsy.com/. Take a look around.
Kim

Challenge #75 Kraftin' Kimmie-Make it Frilly!
Hello crafters, Abby here.
I have been industriously working on my new card for Kraftin' Kimmie's Challenge #75-Make it Frilly.
I started with a Kimmie stamp that I hadn't had the pleasure of inking up yet- the bird fairy. I thought she lent herself well to "frilly-ness."

I colored her using my copic markers, and colored her hair using my newly found technique of feather blending. There are some really great tutorials out there, but my favorite by far is http://www.ilikemarkers.blogspot.com/. Go check it out sometime.
This is a much bigger card than normal, its 5.5"x8.5". I wanted to make it that big because the fariy stamp is pretty large to start out with. I wanted something more than just her on the front of the card. I am absolutely crazy about anything green, so naturally, I stuck with that theme.
I satisified the "frilly" theme by using silk flowers and pearls...it doesn't get much more frilly than that!
This card will be for sale on our etsy shop: http://www.abbyscrafty.etsy.com/.
Hope you enjoy,
Abby
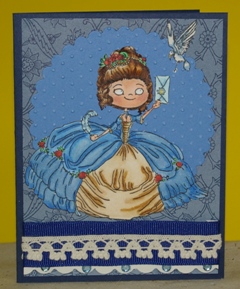
Kraftin' Kimmie Challenge #75 - Make it frilly
For this week's Kraftin' Kimmie challenge, I chose to color the Marie Antoinette stamp with my Copic markers. I decided to design the card in all blues to match the color I had chosen for her dress.
After coloring the image, I cut her out very closely and ran her through my Xyron to make her a sticker. To add the required frill, I added a small strip of cardstock which I scallop punched and placed small bling on every other scallop. To the scallop, I added a strip of navy ribbon and a frilly strip of crocheted trim.
I then completed the card by adding a couple of paper layers including a scalloped circle which I ran through my Sizzix with the Swiss Dots embossing folder. I hope you enjoy viewing my entry this week!
Happy Crafting!
Kim
Thursday, April 21, 2011
StampTV Sketch - STVSKSP22
Well here it is...my entry for the Gina K StampTV sketch this week. Since this sketch was for a card of an unusual shape, it really was quite a challenge.
To create this card, I started with cutting the base using that fabulous Fiskar shape cutter circle shape! I then cut the layers. The first layer is of turquoise cardstock and was cut using my Sizzix Big Shot and my Spellbinders Shapeabilities Pendant dies. This is the first time I have used this die and I have to say, I love it! I then stamped and embossed the butterfly and smile sentiment and cut it with a small Spellbinder scalloped circle. I used my Pumice Stone Distress Ink to distress the white cardstock I had embossed the butterfly on. The edges of the card base were also distressed using this same ink.
I put the entire card together using scrapbooking adhesive and added a small line of ribbon before adhering the piece to the card base.

I will be finishing this week's challenge cards in the morning with the Kraftin' Kimmie Challenge card.
Abby will be here tomorrow to craft with me. We are planning a fun weekend of crafting starting with a Copic class on Saturday. Hopefully, we will produce a lot more items for our etsy shop. Check it out at http://abbyscrafty.etsy.com./
Again, more to come tomorrow...
Kim
Wednesday, April 20, 2011
Stamp TV Challenge STVCSP20
Good Evening Crafters! Wow this week has flown by and I almost missed out on the Stamp TV challenge this week.
This is my entry for the Stamp TV Color Challenge this week. I cut the background images from cardstock using my Sizzix Big Shot and the Sizzix Scalloped Circle die. I then stamped the Easter greeting from the Stampin' Up Something to Celebrate stamp set and cut the tag using my Spellbinders fancy tag set. The edges were embossed with the Spellbinder and inked with some Night of Navy Stampin' Up ink.
I used a sunflower stamp (I don't remember the brand of this one) and stamped the sunflower image on a circle cut from white cardstock using my Fiskar shape cutter. (This is quickly becoming one of my favorite tools.) Once I had all the images stamped, I used my Copic markers to color the flowers with the same yellow as the cardstock I had used in the background. I also inked the edges of this circle using the Stampin' Up Night of Navy ink.
I put the card together using Stampin' Up dimmensionals to attach the flower image to the background scalloped circle. Before I attached the layers to the card base, I placed a strip of Stampin' Up So Saffron ribbon and tied a faux bow around the left edge. Finally the last layer was attached to the card base using scrapbooking adhesive.
The final touch was added using a Stardust glitter pen by Gelly Roll to glitter the centers of the flowers.
Tomorrow's task is to complete the sketch challenge for Stamp TV as well as the Kraftin' Kimmie weekly sketch challenge. More to come...

Happy Crafting! Until tomorrow night...
Kim
Tuesday, April 12, 2011
Stamp TV Sketch STCSKSP21
Good Tuesday Crafters!
Have you ever watched Stamp TV on stamptv.com or YouTube? In my opinion, it is one of the best made and most informative instructional video/sites I have ever used. There are weekly challenges posted all through the week. They really get your creative mind thinking....it's worth the time and effort.
Here is my latest entry into the Gina K. Stamp TV Sketch challenge. The card was really fun to make. It features gold embossing created with a Versamark stamp pad and some a' la mode gold glitter embossing powder. I cut out all the shapes using my Sizzix Big Shot and Spellbinders Classic Scalloped Ovals and Spellbinders Classic Ovals. Oh! How I love those Spellbinders! :)
I also used my Stampin' Up cardstock for the card base and background layers. If you haven't tried Stampin' Up cardstock, you should really give it a try. It is absolutely the best. In fact, it is so great, I keep it separate from the rest of my stock.
I hope you enjoy the card...
Happy Crafting!
Kim

Monday, April 11, 2011
Double embossing
Hello readers,
WOW! What a crazy storm last night! I thought we were going to be blown away, along with all our freshly made cards! Alas, we are still here, and we suffered no damage on this side of town.
Well I'm about to head back to my house in North Dallas, but before I left the wonderful craft room that my mother has, I decided to try my hand at a technique that I saw whilst browsing Split Coast stampers last night during the storm called "Double Embossing."
Find the tutorial HERE
 I don't usually scrap-lift so closely, but this card was so beautiful, I couldn't really think of much else to do to it. The lovely line art image is from the SU hostess set, as well as the sentiment. The cardstock is SU, the ink is Memento Tuxedo black (of course) and the brads are Paper Studio.
Feel free to come visit us on our SHOP at Etsy!
That's all I have for right now, gotta round up the puppy and hit the road soon!
-Abby
WOW! What a crazy storm last night! I thought we were going to be blown away, along with all our freshly made cards! Alas, we are still here, and we suffered no damage on this side of town.
Well I'm about to head back to my house in North Dallas, but before I left the wonderful craft room that my mother has, I decided to try my hand at a technique that I saw whilst browsing Split Coast stampers last night during the storm called "Double Embossing."
Find the tutorial HERE

Feel free to come visit us on our SHOP at Etsy!
That's all I have for right now, gotta round up the puppy and hit the road soon!
-Abby
Sunday, April 10, 2011
Kraftin Kimmie Challenge #73
Hello Readers, Abby here.
Mom and I have had a FULL weekend of crafting, and boy have we been productive! There's a lovely Texas-sized thunderstorm rolling in, and the weekend couldn't have been better! I guess if the power goes out we can craft by candelight!
Here is my submission for the Kraftin Kimmie Challenge #73-sketch.

This is Abigail Apple from Kraftin Kimmie stamps. I stamped her with Memento Tuxedo Black (my fav ink-hands down). I colored her with Copic markers (fav markers, hands down). I also entered her in the Gina K Designs color spotlight challenge, which I have to say, I'm not the happiest with my use of the three colors, they seem way to garish on my card for my taste. But oh well! Can't be a masterpiece every time!
The red circle behind her is a spellbinders die. I used some yellow polka dot ribbon to make the intersecting lines and fan-folded a 1"x6" piece of yellow paper, glued the ends together, then smooshed it down to where it made a nice flower-looking embellishment in the corner. Then I slapped a red button on top with a glue dot and called it finished.
Here are some other card projects going up in our etsy shop (link on the right hand side of the page).


Happy Crafting!
Abby
Kraftin' Kimmie Challenge #73
Good afternoon everyone!
This is Buster and he is my entry for Kraftin' Kimmie Challenge #73. A card sketch utilizing the elements found in this card.
I colored Buster with Copic markers, and used Stampin' Up cardstock and paper to layer the background. I used the spellbinders scalloped edge circle to cut the focal image background piece to provide a place for Buster to rest. I inked the outside edge of the focal image background with Rich Cocoa Memento ink and then used some scrap ribbon in the same pattern as the Stampin' Up foreground layer to create intersecting left and bottom borders. Finally, I stamped a sentiment in Memento Rich Cocoa and used a smaller Spellbinder scalloped oval to cut it out. This time I inked the inside edge of the sentiment to provide definition.
I hope you enjoy viewing him. Buster is such a cool stamp, I had a great time creating him!
Kim

Saturday, April 9, 2011
A Crafty Weekend
This morning Mom and Daughter are off to meet our stamp club to make some awesome cards (created by our wonderful friend, Sandy Jordan). Then, it's off for a little shopping before coming back home to craft a lot more items for our shop (www.abbyscrafty.etsy.com). I bet there will be a lot more to report at the end of the weekend. More to come...
Wednesday, April 6, 2011
Kraftin' Kimmie Challenge #72
Hello everyone!
This is Perfect Poison, and she is my entry for Kraftin' Kimmie Challenge #72- use stripes!
I colored her with copic markers, and used scrap cardstock to layer her background. I inked the edges of some bright purple cardstock with come Memento Bamboo Leaves to tone it down a bit. I also used my IRock embellishing tool to glue on the tiny bling. It's hard to see in the picture, but I also used my Sakura clear Glaze pen to add a bit of shine to her bottle.
I used the spellbinders deckled edge square to cut Perfect Poison out and the spellbinders classic oval to cut out the sentiment. The black scallops are cut using my Fiskars shape cutter, I cut out multiple circles and glued them in a row under the purple strip of paper, since I don't currently have a scalloped edge punch.
This card was also entered in the Gina K Designs Stamp TV Sketch Spotlight Challenge 20.
 A fun tip that Mom and I learned while we were on our way to TN: If you put versamark ink on the blades of your scissors, they won't stick to ANYTHING...especially when you're mounting your stamps on ez-mount...
Anyways...
Happy Crafting!
-Abby
This is Perfect Poison, and she is my entry for Kraftin' Kimmie Challenge #72- use stripes!
I colored her with copic markers, and used scrap cardstock to layer her background. I inked the edges of some bright purple cardstock with come Memento Bamboo Leaves to tone it down a bit. I also used my IRock embellishing tool to glue on the tiny bling. It's hard to see in the picture, but I also used my Sakura clear Glaze pen to add a bit of shine to her bottle.
I used the spellbinders deckled edge square to cut Perfect Poison out and the spellbinders classic oval to cut out the sentiment. The black scallops are cut using my Fiskars shape cutter, I cut out multiple circles and glued them in a row under the purple strip of paper, since I don't currently have a scalloped edge punch.
This card was also entered in the Gina K Designs Stamp TV Sketch Spotlight Challenge 20.

Anyways...
Happy Crafting!
-Abby
Monday, April 4, 2011
Kraftin Kimmie Stamps - Challenge #72
I chose a favorite Kimmie stamp for this week's challenge. This is Patsy, she is a 50's girl, but she fits right in with the multi-colored stripes mixed in with the small polka dots I added to the background of this card.


Subscribe to:
Posts (Atom)